Wednesday, December 17, 2014

Gingersnap Beef Stew


This recipe was originally supposed to be a slow cooker version of Gingersnap Pot Roast. I didn't have the time to make a whole pot roast (or the mouths to feed all that food!) so I pared it down into a simple beef stew.

Now, you may be as confused as I was when I read Gingersnap? In a beef stew? Trust me, its good. It's really good. This stew is perfect around this time of year when we get into all those spices in cookies and cakes and now, beef stew. The gingersnaps give it a nice light ginger flavor and adds a touch of sweetness that pairs perfectly with the beef.

This stew has lots of veggies, from carrots to onions to parsnips to sweet potatoes, and cooks in about an hour. It is perfect for any weekend at home where you just want something comforting but easy. Want to make it even more luxurious? Serve it over some fresh mashed potatoes for a nice bite of heaven!


Gingersnap Beef Stew

Recipe by Rachel Vdolek

An easy winter beef stew with gingersnap cookies.

Prep time: 15 minutes
Cook time: 1 hour
Total time: 1 hour 15 minutes
Yield: 4 servings

Ingredients:

 1 lb  cubed beef stew meat
2 c. beef stock
5 gingersnap cookies
2 tbsp red wine
yellow onion, cut into 1/2" wedges
2 sweet potatoes, peeled and cubed
carrots, peeled and cubed
parsnips, peeled and cubed
1 clove garlic, minced
1 bay leaf
1/8 tsp cayenne pepper
1 tsp salt
1/2 tsp pepper


Cooking Directions:          

            In a large Dutch oven, heat 1 tbsp oil over medium high heat. Brown stew meat in batches, if necessary. Remove from pan. Add in onions, potatoes, carrots, parsnips and garlic. Cook for 2-3 minutes until garlic is fragrant, then add in meat, stock, wine, bay leaf, cayenne pepper, salt and pepper. Add water until veggies and meat are covered. Put cookies in a food processor and process until they are like bread crumbs. Add to stew, then bring to a boil. Reduce heat to low and simmer for 45 minutes or until stew meat is tender.

Serve with crunchy bread or over mashed potatoes.


Like this recipe? Sign up for my email list to get weekly recipe digests and be entered for a monthly drawing for a free copy of one of my cookbooks (Up to $31.95 value. Limit one per person). Next drawing is on the 15th of January!


Monday, December 15, 2014

Pineapple Cantaloupe Strawberry Smoothie (Dairy Free)

Wow, its almost Christmas. Can you believe it? I can't! This year has just flown by and I want it to slow down!

My parents had their annual Christmas party last week and I was the lucky winner of all the fruit leftovers, plus some delicious meatballs. Yay! The fruit was going south quickly and there was so much of it that I couldn't eat it all in one sitting. So what did I do? I made a smoothie!

This smoothie was so good and creamy that I drank it all, even though it really is enough for 2 servings. The trick to getting it really creamy without using any dairy is to use a frozen banana. I always end up with that one last banana that is too ripe for my taste, so I pop it in the freezer to either make banana bread or smoothies with them. I've even seen people use frozen bananas as a base for ice cream!

Give this smoothie a try for breakfast! It's sweet without any added sugar and will give you a wonderful start to your day.


Pineapple Cantaloupe Strawberry Smoothie
Makes 2 drinks

1 c. pineapple pieces
1/3 c. cantaloupe pieces
about 12 strawberries, hulled
1 frozen banana, peeled and cut in half
1 c. orange juice

In a blender, combine all ingredients. Blend until smooth. Serve immediately.


Like this recipe? Sign up for my email  list to get weekly recipe digests, updates on events and be entered for a monthly drawing for a free copy of one of my cookbooks (Up to a value of $31.95. Limit one per person). 

Thursday, November 27, 2014

Thanksgiving Leftovers: Turkey Stuffing Sandwich and Turkey Soup

Thanksgiving leftovers are the best, but sometimes I get a little sick of eating just turkey with a little cranberry sauce. In the past few years, I've made a couple of dinners out of leftover Thanksgiving turkey and they have become my favorite way to enjoy Thanksgiving well past the 4th Thursday of November. 

The first recipe I'm going to give you isn't really a recipe, but it is so good that I've even bought pre-made stuffing, turkey and cranberry sauce from my store's deli to make this sandwich. It is that good! If you have any leftover mashed potatoes, add those in too! It will be messy but perfect!

The second recipe is for my turkey soup. I like to let the turkey bones simmer for at least an hour, if not an hour and a half (which is perfect to do during a football game!) and I usually add in some rice and frozen corn to add some extra density to the soup. I make a big batch and then freeze some to eat in the coming weeks. 

Give these recipes a try on the day after Thanksgiving. Your family will love them!


Thanksgiving Leftover Sandwich
Makes as many sandwiches as you have leftovers

Leftover turkey meat, sliced into strips
Leftover stuffing
Leftover mashed potatoes
Leftover cranberry sauce
Sourdough or Rye bread

Place bread slices on a cutting board. Lay turkey on one side of each sandwich. Spread a spoonful of cranberry sauce on the turkey, then top with a layer of mashers and stuffing. Top with the other slice of bread. Squish on a heated panini press if you would like, or just enjoy as is.


Turkey Soup
Makes at least 8 servings

Leftover turkey carcass
Any leftover chicken stock
Leftover turkey gravy
1 tsp garlic powder
1/2 tsp ground sage
1 tsp dehydrated onion
1 tbsp salt
1 tsp ground pepper
1 yellow onion, chopped
3 celery stalks, chopped
3 carrots, peeled and chopped
1 c. frozen corn
1/2 c. white rice

Pick any excess meat off the carcass, then place in a large stock pot, breaking into pieces if needed. Set meat aside for later. Pour in any leftover chicken stock and add enough water to cover all the bones. Add in garlic powder, sage, dehydrated onion, salt and pepper. Bring to a boil over high heat, then reduce to medium and let cook for at least an hour, up to an hour and a half. 

Remove carcass from the stock pot and scoop out any pieces that came off, saving the broth. Bring the broth to a boil, then add in the onion, celery and carrots. Cook for 10 minutes over medium heat, then add the rice and up to 1 c. of leftover gravy. Cook for another 10 minutes then add the corn. Simmer for a final 5 minutes, then add turkey meat. Heat for a few minutes to warm up turkey meat, then serve hot with any leftover rolls.

Wednesday, November 26, 2014

Fall Fruit Salad

Fruit salads are always a hit in my family. Unfortunately, most of the time they have Jell-O involved, which I'm not a fan of. I wanted to create a salad that was tasty but still loved by the family, and I think I've done it.

This salad has apples as the base, with some persimmons and pomegranate seeds to add some color and flavor. I added walnuts for some extra crunch and tossed it all in a cranberry orange dressing. I ate bowlfuls of this salad and I just wanted to eat all of it!

I used Opal apples because they have crunch but have a great, almost watermelon-like flavor. If you prefer, any crisp apple like Fuji, Pink Lady, or my favorite Honeycrisp would work beautifully. For the persimmons, you want to be sure to get the Fuyu persimmons which are eaten when they are a bit more firm than the other varieties. Pomegranate seeds are usually sold in fall in little containers by the bagged salad or pre-cut fruit in your store so you won't have to split open and knock out all the seeds of a whole pomegranate. If you want to get the seeds from a whole pomegranate, then you will need seeds from about 1/4 of a regular pomegranate. 

This fall fruit salad would be perfect for Thanksgiving or any family meal. It's festive and tasty, perfect for your table.


Fall Fruit Salad
Serves 4

2 apples, cored and chopped
2 Fuyu persimmons, top cut off and cored then cut into cubes
1/4 c. pomegranate seeds
1/4 c. chopped walnuts

Dressing:
1/2 c. whole cranberries
1/4 c. water
1/4 c. orange juice
1/4 c. sugar

In a small saucepan combine all ingredients for dressing. Bring to a boil over medium high heat, then simmer for 5 minutes or until cranberries pop. Remove from heat, let cool for 10 minutes, then strain using a mesh strainer. Using the back of a wooden spoon, squeeze all the juice out of the cranberries. Set dressing aside.

In a large bowl, combine apples, persimmons, pomegranate seeds, and walnuts. Drizzle dressing over fruit, then toss to combine. Chill for at least 1 hour before serving.

Extra tip: the cranberries used in the dressing that are left in the strainer make a great spread for a stuffing and turkey sandwich, perfect for the day after Thanksgiving. 

Monday, November 24, 2014

Apple Sage Stuffing

Ok, so stuffing (or dressing, as my honey would call it) is my favorite part of Thanksgiving. I love love love stuffing. The soft bread cubes are strangely delicious, especially with onions and garlic and sausage. 

My favorite addition to stuffing is chopped apples. They add a sweetness and extra crunch to the stuffing that I just love. I also use chicken Italian sausage instead of regular pork sausage to lighten things up a bit. If you prefer to use sage sausage (like my man does), simply reduce the amount of sage to 1/2 tsp.

Give this stuffing recipe a try for your Thanksgiving dinner. Your family will love it!


Apple Sage Stuffing
serves 6

up to 2 tbsp olive oil
1 lb ground chicken Italian sausage
1 onion, diced
1 clove garlic, minced
4 stalks celery, sliced
1 Fuji or Pink Lady apple, cored and chopped
1 large bag of stuffing mix
2 tsp ground sage
1 to 1 1/2 cups chicken stock
1/2 tsp salt
1/4 tsp pepper

Preheat oven to 350 F. In a large stock pot, heat 1 tbsp oil over medium heat. Add chicken sausage and brown until no more pink remains, stirring frequently. Remove from heat, leaving some of the fat, then add onion, garlic and celery. Add a little more olive oil if needed to prevent the vegetables from browning too quickly. Cover to help cook the vegetables a little faster. Stir every few minutes until the celery and onions are soft, but not mushy.

Add apple and cook for another minute. Add sausage back in, along with the stuffing mix, minus the seasoning packet. Turn heat off and toss to mix. Add in salt, pepper and sage and toss again. Pour the chicken stock in, half a cup at a time, tossing in between additions to soak the bread cubes. Add enough stock to make the cubes soften and almost mushy. 

Pour stuffing mix into a 9x13 ceramic baking dish, spreading it out evenly. Cover with foil, and bake covered for 20 minutes. Remove foil and continue baking for another 10 minutes to crisp up the top. Serve hot. 

Friday, November 21, 2014

Barley Beef Soup

I love hearty veggie filled soups in the colder months. I swear, I make a batch of soup every week, whether its a veggie puree or a chunky soup. What can I say, I love soup!

I especially love this barley beef soup. It's filled with so many good things in it, from tons of veggies to deliciously filling barley. In most barley beef soups I've had, the barley gets cooked to mush, which isn't very tasty. By using regular pearl barley and cooking it longer, you get nice perfect pearls of barley that aren't mushy. 

This soup also has a more tomato-y taste to it rather than a heavy beefy taste, which I like a lot. If you aren't a fan of bouillon, feel free to add in 4 cups of beef stock instead of the water. I like it better with the stock, but sometimes the bouillon is what you have on hand. This soup also freezes well, and it makes quite a bit, so be ready with containers to freeze this tasty soup!


Barley Beef Soup
Serves 6
recipe from Better Homes and Gardens

3/4 lb. stew meat
1 tbsp olive oil
4 c. water
1 medium yellow onion, chopped
2 stalks celery, chopped
2 carrots, peeled and diced
1 tbsp beef bouillon
1 tsp dried oregano
2 cloves garlic, minced
1 bay leaf
1 c. frozen mixed vegetables
1 14.5 oz can diced tomatoes, undrained
3 medium Yukon Gold potatoes, cubed
1 c. pearl barley (not quick cooking)

In a large Dutch oven, brown stew meat in olive oil over medium high heat. Remove from pan, then add onion, carrots and celery. Cook for 5 minutes or until onions begins to brown. Add water, beef bouillon, oregano, garlic, bay leaf and barley. Bring to a boil then reduce heat. Simmer covered for 1 hour. 

Stir in all remaining ingredients. Bring back to a boil, then reduce to a simmer for 15 minutes. Remove bay leaf and serve with rolls. 

Wednesday, November 19, 2014

Apple and Walnut Salad with Walnut Cider Dressing

My inspiration for this salad came from the classic pear and blue cheese salad I always read about when fall comes around. Since Mark is allergic to pears, I decided to switch it up and use some honey crisp apple slices. To make super thin slices, I used a mandoline, but if you don't have one, feel free to just chop the apple instead.

I skipped the blue cheese to make it a bit lighter, and added some fresh pressed apple cider to the dressing for some extra sweetness. This has got to be my favorite salad dressing! I love the ginger and mustard undertones with the delicious walnut oil. If you can't find walnut oil, feel free to substitute in olive oil. It won't be quite the same, but it will still be good.


Apple and Walnut Salad with Walnut Cider Dressing
serves 2

Greens
1/2 apple, sliced
1/2 c. walnuts, chopped

Dressing:
1 tbsp apple cider
2 tbsp walnut oil
1 tbsp white wine vinegar
1/4 tsp ground mustard
1/4 tsp ground ginger
1/8 tsp salt

Lay a handful of your favorite greens onto a plate or in a bowl. Top with apple slices and walnuts. Add all ingredients for dressing into a jar, seal with lid and shake to combine. Drizzle over salad and eat.

Monday, November 17, 2014

Caribbean Spiced Pumpkin Soup

It's been a while since I've cooked and taken a picture of it, well since I finished my last book. I've been busy working on hats and jewelry for my Holiday Gift Festival, which was last weekend and went pretty well. It didn't have as big of a turnout as I was hoping, but it was my best show yet!

Starting this week, I want to cook every day since I've been eating out a lot lately, alternating with being sick and downing gallons of chicken noodle soup. It's time for me to get my cooking groove back, starting with the Caribbean spiced pumpkin soup.

I love pumpkin in fall (as does everyone else, it seems!). I prefer my pumpkin to be on the savory side, although I will never say no to pumpkin pie. This soup hits the spot with some allspice, ginger, coriander and a sprinkling of cilantro added in, along with coconut milk to make it extra creamy. Make a batch of this soup tonight to satisfy your pumpkin cravings.


Caribbean Spiced Pumpkin Soup
Serves 4

1 tbsp olive oil or coconut oil
1 onion, sliced
2 medium carrots, peeled and sliced
1 clove garlic, minced
1 tbsp chopped cilantro
2 tsp fresh grated ginger
1/2 tsp ground ginger
1 tsp ground allspice
1 tsp ground coriander
1 tsp salt
1 3/4 c. vegetable stock
1 15 oz. can pumpkin 
half a 15 oz can of full fat coconut milk (about 1 c.)
chopped cilantro, for garnish

In a large saucepan, heat oil over medium heat. Add onion, carrots, garlic and cilantro. Stir to coat in oil and let cook for 5 minutes. Add vegetable stock, ginger, allspice, salt and coriander, and let simmer over medium heat, covered, for 10 minutes until carrots and onions are soft. Add in pumpkin and coconut milk. Puree using a hand blender or in a regular blender, being careful since the soup will be hot! Pour back into saucepan and bring up to barely a simmer over medium heat. Serve hot with a few leaves of cilantro sprinkled over the top. 

Thursday, October 30, 2014

Simple Sweet Hearty Scones

On our way to climb Mt. St. Helens, Mark and I stopped at the Cedar Creek Grist Mill in Woodland, WA. How did I find out about this marvelous place? From the Puyallup Fair!

Are you confused yet?

Well, let me explain. When I was enjoying looking at all the pretty photographs entered into their photography contest, I noticed there were several of the same exact old looking building. Well, this one:


I looked a little closer and noticed that they were all of the Cedar Creek Grist Mill. Thanks to Google, I found out it was in Washington. Hurray! I will be able to visit it some day! So I added it to my list of places I want to visit, and then forgot about it. 

Until we were driving to Cougar and I saw the sign for the Cedar Creek Grist Mill. Naturally, I yelled, turn here! And off we went. 


The mill was built in 1876, but has been restored and operated by a bunch of volunteers since the late 1980's. We got an awesome tour after walking along the creek, then we got to watch them mill some corn into coarse cornmeal. And of course, I had to bring some home! I also grabbed a bag of flour, at a $6 donation per bag. They had tons of recipes to try, too, so I had to take ALL of them. 

When I got home and recovered from the climb, I decided to make their simple sweet scones, my way of course. The only thing I changed was that I used soy milk instead of regular milk and I increased the amount of liquid to 1 c. from 2/3 c. Otherwise, they were perfect and hearty, especially since I used the flour from the mill. Served with some raspberry jam, they were the perfect late summer breakfast.


Cedar Creek Grist Mill's Simple Sweet Scones
makes 8 scones

1 1/2 c. AP flour
1 tbsp baking powder
1 c. whole wheat flour
1/4 c. sugar
1/2 tsp salt
1 stick cold butter or vegan butter, cut into small pieces
1 c. soy milk or cow's milk

Preheat oven to 425 F. Mix together flours, baking powder, sugar and salt in a large bowl. Add butter and cut with a pastry blender or two knives until the butter is the size of small peas. Add milk and stir until a soft dough forms. (Use those arm muscles!) Form the dough into a ball, then pour onto a lightly floured board. Knead a few times until dough just holds together.

Shape into a ball, then pat or roll into a roughly 6" circle or square, depending on how you want the shape of your scones to be. Cut into 8 wedges and place on an ungreased baking sheet, leaving at least a quarter inch between them.

Bake for about 12 minutes or until lightly brown on top. Cool on a wire rack, then serve with butter and jam. 

Tuesday, October 28, 2014

30 Quick Easy Meals

Hello there! I've disappeared for a bit to finish up my newest cookbook, but I'm back and here to tell you all about my newest book. My book is called 30 Quick Easy Meals and it's all about cooking healthy, quick and easy meals for only one or two. 


30 Quick Easy Meals is the go-to cookbook for anyone who is busy but wants to eat delicious, healthy food at home. So many people in today's world live by themselves or with another person, be it a roommate or a significant other, yet recipes are still made for a family of 4. This cookbook changes that with nearly every recipe portioned for 2 people, and filled with great ways to use leftovers. 

Reasons you will love 30 Quick Easy Meals: 
-30 min or less prep time
-Uses common ingredients so you won't have to search at the store 
-Filled with easy comfort food recipes that won't break the bank 
-Many recipes have vegan/vegetarian options 
-Lots of cooking tips to save time and money! 

Written by someone (me!) who has needed easy and quick recipes plenty of times, this book is a great cookbook for any college student, grad student or anyone who is busy and needs to make dinner fast.

30 Quick Easy Meals is available on Amazon in print and for Kindle or iPad. Click here to see a preview and check it out!

Hope you enjoy my recipes!

Rachel


Friday, October 3, 2014

Why You Should Eat Seasonally


What is seasonal eating? It's simple actually, it's eating produce when it's at its peak. Since the advent of the grocery store and the move from farms to cities, people have eaten seasonally less and less due to the fact that produce can be either grown year round in hot houses or shipped in from faraway lands. Unfortunately, this can mean eating fruits and vegetables that were picked before being ripe and then transported long miles to get to your plate.

So why should you eat seasonally if your favorite fruits and vegetables are available year round? Here's a few reasons why:

1. Saves money. Yes, eating in season saves you money. Who doesn't love that? But how does it save me money, you ask? It's simple economics. Because there will be more fruit or vegetables available during its peak season, the prices will go down and you can get more for your money. Take apples for example. This summer, my favorite apple variety, Honey crisps, were up to nearly $5 a pound! And that wasn't even organic. But as soon as September rolled around, the prices kept dropping, and are continuing to drop even more since it's now apple season. I've seen apples as low as $1 a pound. That's $4 in savings right there! Why are they so expensive in summer, even though I live in the state that is the number 1 state for apples? Because the apples in summer have been stored since being picked last fall and they definitely don't taste as good as one that was just picked from the tree.

2. Saves time. By buying produce in season, you can save yourself time by cooking recipes that require little to no cooking because the flavor is already awesome. See point #3 for more on awesome flavor!

3. Flavor is better. I'm sure you have heard of the bland tomato in winter (or maybe even tasted one!) They are not delicious and most of the time they need to be cooked or be from a can to get any flavor from them. The same goes for any fruit or vegetable. The flavor is going to be better when the produce is at its peak simply because the fruit will be picked closer to optimum ripeness and will give you that amazing flavor you long for.

4. Support local farmers. If you buy in season, you can buy from local farmers at farmers markets because they are only going to be able to have things that grow in season and they won't have them shipped in from across the globe. Plus, farmers markets will save you money too by buying directly from the farmers and cutting out the middlemen. Bonus!

5. Variety. Instead of eating the same oranges, bananas and apples day in a day out all year long, you can try many other fruits and vegetables. In spring and summer, you can enjoy lots of berries, then transition to stone fruits in later summer before finally chowing down on juicy apples and pears in the fall and winter. Variety is definitely the spice of life!

6. More in tune with the seasons. Our bodies are naturally regulated by the seasons. Ever notice how in winter you seem to need more sleep because it's darker out more? Enjoy the different seasons of the year by eating different fruits and vegetables throughout the year and feel yourself being more in tune with nature. Ahhhhh feel more relaxed now?

7. Better nutrients. By buying produce when it's at its peak, you are getting more nutrients for your buck. As soon as its picked, the produce begins to lose its nutritional value and those vitamins and minerals degrade over time. Why not get the ear of corn that was picked early that morning rather than earlier in the week?

8. Better for the environment. Have you ever thought about how much pollution is caused by transporting food halfway across the country? I understand that some places simply do not have the bounty that say, California, has, and some places, like Washington, simply don't have the climate for certain fruits and vegetables, like oranges and lemons. But why not enjoy what your area has to offer? If your state grows amazing cherries, enjoy those amazing cherries. I'm not saying to not ever enjoy an orange, but rather to focus on locally grown produce over stuff grown a long ways away.

Now that's I've convinced you to eat more seasonally, where to start? Here are some great resources to find out what is available at certain times of the year for where you live:

Eat the Seasons
Seasonal Food Guide
State by State Guide

Start by going to farmers markets to see whats available. You can also invest in a CSA box that will do the work for you and provide you with locally grown, farm fresh produce. My favorite is Full Circle Farms.

But what about recipes? That's what Google is for! Here are some search suggestions. Just fill in the blank with either a season, fruit or vegetable. Plenty of deliciousness will appear!

____ Soups
____ Recipes
____ Meals
____ Dishes
____ Desserts
____ Salads

Want some seasonal cookbooks? Here I have made an Amazon list of my favorites. Click here to read more.

If you have any other questions about seasonal eating, please don't hesitate to contact me via my contact page. I'd love to answer them!


Sources:

Pacific Northwest Seasonality Guide
4 Great Benefits of Seasonal Eating

Benefits of Eating What's in Season

Wednesday, October 1, 2014

Cinnamon Spiced Apple Cider

When apples become really cheap at the stores again, I love baking with them, cooking with them, and eating them raw. Apples are definitely my favorite fall fruit. 


I also love spiced apple ciders in fall. They are the perfect chilly night drink, don't you think? My store carries a locally pressed cider that is so sweet and delicious on its own, but I love it when a little spice is added to it. Unfortunately, most syrups in the stores contain HFCS, caramel coloring and/or dairy by-products, so I prefer to make my own. It's so simple, too!

I made mine to be similar to a Cinnamon Dolce syrup, except I used regular sugar instead of the brown sugar that would give it the "dolce" flavoring. If you like that extra silky, molasses-y flavor, use dark brown sugar in place of the regular sugar. It will give the syrup a darker color and it will taste a lot like the store bought version, but healthier!


Cinnamon Spice Syrup
makes about 1 1/2 c. syrup

1 c. water
1 c. cane sugar or dark brown sugar
2 cinnamon sticks plus 1 tsp ground cinnamon
1 star anise
1 cardamom pod
2 cloves

In a medium saucepan, combine water and sugar. Bring to a boil, then reduce to a simmer for a few minutes, stirring until all the sugar is dissolved. Remove from heat and add spices. Let stand for 10 minutes, then remove star anise, cardamom and cloves. Continue steeping the cinnamon for another 10 minutes, then remove the sticks. The spices can be reused, but will need to steep just a few minutes longer for each extra use. Pour syrup in a bottle or mason jar to store. The syrup will keep for a few days to room temperature, but will keep much longer in the fridge. 

To make a spiced apple cider, combine 1-3 tbsp of syrup per 8 oz of heated cider or apple juice. I like to use my milk frother to really mix it well and to add a little foam on top. Top with whipped cream, if desired. 

Monday, September 29, 2014

Peach Green Smoothie

Hello there! I took a mini vacation last week since I was recovering from climbing Mt. St. Helens a week ago. Whew it sure took the energy out of me!

To help recover, I started to make a few smoothies as afternoon snacks to help keep my blood sugar a bit more stable. I had a peach that was almost over ripe, plus a few bananas that needed to be eaten. I added a handful of greens to up the nutrient factor, and then added some chia seeds and a little cinnamon for some flavor. It was delicious! I'm slowly coming around to having greens in my smoothie, and by adding the peach and the banana, I didn't need any additional sugar at all!


Peach Green Smoothie

Serves 1

1 peach, pitted and cut into wedges
1 really ripe banana, peeled and cut in to 2 pieces
1 1/2 c. soy milk or your favorite alternative milk
1 handful greens (I used baby kale)
1 tbsp chia seeds
1 tsp cinnamon

Combine all ingredients in a blender and blend until smooth. Add a little more soy milk if desired to thin the consistency. 

Enjoy!

Friday, September 19, 2014

Dining in Whistler

Whistler is one of my favorite places to visit, in summer and in winter. One of the great things I love about Whistler is the food. Yes, it is a bit spendy, but it's almost always delicious. Whistler is really great about alternative diets, whether you are vegan/vegetarian or have an allergy. Almost every single restaurant I have eaten at there has been very accommodating, whether the place is in the village or on the mountain. I wish I could find places down where I live that are so great with my allergies!


Growing up, my parents would take me to Whistler quite often because the company my dad worked for would have regional meetings up there. I always loved visiting and have so many good memories there, including one of me doing a cartwheel in the middle of the Village Stroll right at the base.

Whistler is a great place for skiing, hiking, and mountain biking, but I'm here to talk about the food! On this last trip, Mark and I started out at the Brewhouse. Located at the end of the Village Stroll, the brewhouse has good food and great beer! This trip, I tried their salmon burger (minus the wasabi mayo of course), which was amazing! It was the best salmon burger I have ever had. The Alta Pale Ale went down really nicely with the burger. Mark got their regular burger and tried their Lager , which was also really tasty. They had a band playing the first night we were there and they were really good, trombone and all!


The next day, we ate breakfast in our room before heading out to wander the Village Stroll. Of course, we had to stop at Starbucks, which had better mochas than the ones they make down here. Then we wandered around for a bit, taking pictures of everything! We searched out this little pastry shop we visited last time, but found it was gone and replaced with a taco bar. Darn :( it was one of the few places that had really good vegan pastries that I could eat!

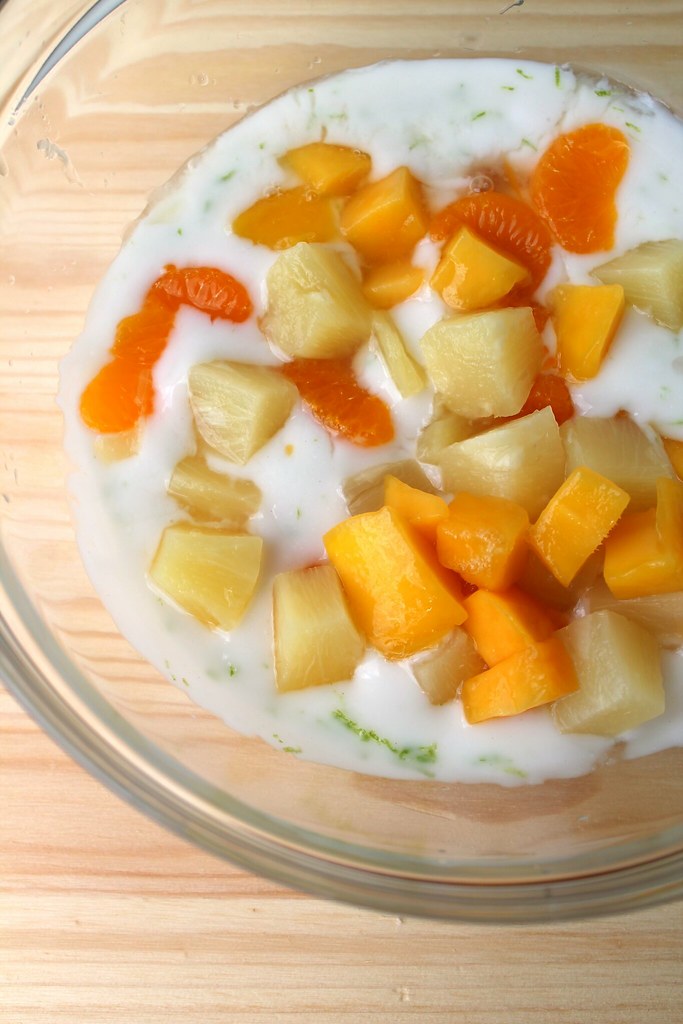
 We stopped at the IGA Market to pick up stuff for lunch. Of all the time I have been to Whistler, I have never really been inside the IGA; we always went to Creekside Market or the other little grocery store along the Village Stroll. This one was way better! They had a huge deli with lots of delicious yummies. Their prices were much cheaper too! We forgot to bring jam to make PB&J sandwiches, but we found some cute little jam jars that we bought to bring back as souvenirs. They were so cute!

After gathering provisions, we headed back to the room to soak in the hot tub. It was warm out, but not too hot, so the hot tub felt good. We napped and watched tv for a bit, just taking a nice time out, then we headed to dinner. I had been dying to eat at Sachi Sushi since the last time I had eaten there almost 10 years ago, and so we decided to try them out. The sushi was delicious! We got miso soup, plus 3 nigiri: salmon, yellowtail and eel. They were all just as good as where we normally go for sushi. We were still hungry after that so we ordered salmon rolls, tuna rolls and Mark ordered their Sachi roll, which he really liked, but I didn't eat because it had mayo in it. I would highly recommend eating there if you like sushi.
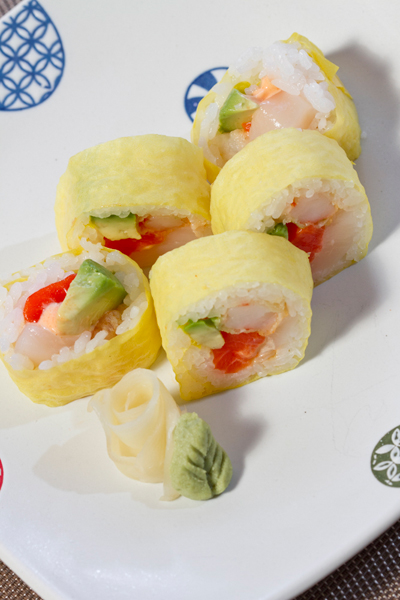
From Sachi Sushi
After sushi, we headed to the Garibaldi Lift Co. for some drinks. Simon, our bartender, was a very friendly guy who chatted with us because the place was mostly empty due to it being a Monday in September. We watched plates of nachos and other goodies come out of the kitchen, all of which looked great. The drinks were a bit expensive, but they were tasty. I broke down and ordered some yam fries with a balsamic glaze, and they were oh so heavenly. I can't tell you how much I love yam fries, but the balsamic glaze put it over the top with its sticky sweetness that paired perfectly with the salty fries. I want another batch now!


The next morning, we decided to try a local place for coffee. The Mount Currie Coffee Co. was right around the corner from our place, so we gave it a try. I got a vegan chocolate raspberry bar that was delicious, while Mark headed straight for the espresso. He said that it was better than Starbucks, so we frequented Mount Currie for the rest of our trip. I wanted to do a short hike up on the mountain, so we packed some goodies and headed for the gondola. The hike turned out to be a lot longer than we expected, but it was so beautiful up there! If you love to hike, be sure to do the High Note Loop. The lakes and mountains are gorgeous!


After our hike, we headed down to shower and then have dinner. We were so hungry that we just ended up at the Brewhouse again. This time I ordered the Thai chicken salad, with the dressing on the side just in case. It was the best Thai chicken salad I've ever eaten, and it didn't even need the dressing because it was so flavorful. I loved that it wasn't just chicken and lettuce, but they made a carrot, snap pea, shiitake mushroom and bell pepper slaw that was mixed in with the chicken. I don't like mushrooms, but those shiitakes were delicious! Mark went for the Hawaiian pizza, and he said it was the crispy crust that he loves. Next time, we decided we are going for the poutine since it's a classic and neither of us have ever tried it.


Even though we had all that good food, the best meal was breakfast on our last day. While riding the Peak to Peak gondola, we chatted with a couple from Stanwood, WA. They told us about the Wildwood Cafe, which I had never heard of it. It is tucked in behind the tennis club and was reputed to have the best breakfasts in town. Of course, we had to try it! Oh my gosh, it was delicious. I got the no-eggs breakfast, which included roasted potatoes, some tomatoes, cranberry toast, and sausage. Mark got the Benny of the Day, which was eggs Benedict with avocado and bacon. Everything we ate was delicious. The cafe has this open lodge feel, which I loved. It was the perfect ending to a great trip. I can't wait to go back to eat at Whistler again!


If you are headed to Whistler, here are some of my favorite places to eat at:

Creekside: I love Dusty's, which is the big name over at Creekside, but I'm also a fan of Roland's Pub. It's more of a local's hangout, but they have delicious yam fries.

Village: 21 Steps is a great romantic little eatery that is, you guessed it, up 21 steps. You can people watch from above while dining on deliciously fresh seafood. A little pricey, but it's so worth it. I also recommend the Dubh Linn Gate, right at the base. It gets crowded because it's right at the base of the gondolas, but I loved their Steak and Guinness Pie.

On Whistler: The Chickpea Hut is now my favorite place to eat because of the vegan chickpea stew they have there. It's so warm and comforting during a cold ski day. The Roundhouse is the main place to eat, and they have good food too, but it can get really noisy and crowded there. Good news, is that everywhere on the mountain, they have their menus labeled with Vegan/Vegetarian, so it's easier for people with alternative diets to eat without having to ask a million questions.

On Blackcomb: I love the Glacier Creek Lodge. It's not as big as the other lodges, but they have a good selection of food. Their soup and noodle bowls are my favorite. The Horstman Hut is also a fun place to eat, since it's on the top of a ridge and only accessible by riding either a chair or a T-bar. They serve mostly heavy, comfort food like meat pies and stews.

If you have the time, take the trip to Whistler. It's an amazing place filled with lots of people from all around the world and tons of good food.

Tuesday, September 2, 2014

Orecchiette with Zucchini and Bacon

I've been having a bit of writer's block when it comes to blogging. I can write up recipes no problem and test them out plenty of times, but writing the part that goes above the recipe? I'm not doing very well with that.

I don't know why I have writer's block for that. I can write oodles about my hikes and trips, but get to describe a recipe that I wrote.. I have to pause for hours before it comes to me. Does anyone else have this problem? What are your solutions?? I need some inspirations...

In other news, I've decided to split my cooking and travels into two different blogs. If you would like to still read about my hikes and travels, you can visit my new blog, Rachel's Travels. I'll still be posting a lot of food stuff here, so don't worry :)

Speaking of recipes and food stuffs, I came up with this recipe last week to use up my last little bit of zucchini I had bought. My fridge contained bacon, carrots and onions, and I was craving pasta, so I sauteed the bacon and veggies while the pasta cooked, then combined it all together for one really good meal. It came together so quickly and was so comforting. It was just perfect for dinner.


Orecchiette with Zucchini and Bacon
Serves 4

1 c. orecchiette or any shaped pasta
1 garlic clove, minced
2 strips bacon, sliced
1/2 yellow onion, finely diced
2 carrots, peeled and finely diced
1 zucchini, diced
olive oil
salt and pepper

In a large stock pot, cook orecchiette according to package directions. Drain and set aside.
Heat a large saute pan over medium high heat. Cook bacon until almost crispy, about 3-4 minutes, then remove from pan, leaving some of the bacon fat. Add a little more olive oil if needed, then saute garlic, onions and carrots for 4-5 minutes until carrots begin to soften. Add zucchini, salt and pepper and cook for another 2-3 minutes until zucchini is cooked. Add orecchiette and bacon to pan and toss to combine, adding a little more olive oil if needed to coat everything. Serve hot.


Tuesday, August 26, 2014

The Summer Kitchen - Free Sample

The Summer Kitchen is going to be available on Amazon in print in 3-5 days and for Kindle and iPads tomorrow! I am so excited to share this with you all. It's been a great ride making this second cookbook and I'm loving learning how to do this. I love being able to create recipes and share them with everyone.

This book was all about summer produce and my favorite ways to eat them. From tomatoes and zucchini, to peaches and berries, I've got you cooking delicious food all summer long. I have appetizers, soups, salads galore! Desserts and drinks are also included :)

I'm also so excited to say that I wanted to give everyone a free sample of my book that has 12 of the recipes, one from each section. The ones I selected are some of my favorites, but it was so hard to pick just 12!

I have included these recipes:


Asian Crab Salad on Cucumbers


Roasted Veggie Salad with Crab


Hoisin Chicken Wraps


Grilled Summer Squash and Honey BBQ Chicken Sandwiches


Roasted Italian Cherry Tomatoes


Chocolate Zucchini Bread


Apricot Vanilla Soda


Blueberry Walnut Oatmeal


Cherry Lemon Soda


Lime Yogurt with Tropical Fruits


Cantaloupe and Mango Salad


Chia Seed Pancakes with Nectarines and Blueberries

Aren't you hungry now? I sure am! If you would like to download your copy of my free sample, click here! And please please please share that sample with everyone you know! I want as many people as possible to enjoy my food :)

Have a wonderful day!

Rachel


Monday, August 25, 2014

Sauteed Kale with Crispy Potatoes

The other night I was in a rush for dinner and had no idea what to make. I had some kale leftover in my fridge, and some potatoes in my pantry, so I decided to make a simple sauteed kale with roasted potatoes for dinner. Plus I wanted to eat some of the potatoes again for breakfast since I have been craving a good potato hash for weeks now!


I absolutely love dinners like this. They are so simple, yet so filling for the stomach and the soul. The weather here has been trending towards cooler temperatures (Pumpkin Spice Lattes anyone??) so it felt good to eat some comfort foods after a summer of grilled veggies and salads.

Are you ready for comfort foods or do you prefer lighter fare like salads?


Sauteed Kale with Crispy Potatoes
serves 4

3/4 lb. potatoes, cut into medium sized cubes
salt and pepper
1 bunch kale, rinsed and roughly chopped
1/2 red bell pepper, diced
1/2 yellow onion, diced
1 clove garlic, minced
1/4 c. white wine

Preheat oven to 400 F. Toss potato cubes with 1 tbsp oil and sprinkle with salt and pepper. Spread out evenly on a baking sheet and bake for 10-15 minutes until crispy, shaking pan every 5 minutes or so to prevent sticking. Remove from oven and set aside to cool slightly.

Meanwhile, in a large saute pan, heat 1 tbsp oil over medium heat. Add onions, garlic and bell peppers and cook for 3-4 minutes until onions are soft and bell peppers are crisp tender. Add kale and wine, and toss continually until kale has begun to wilt. Serve kale with potatoes on the side.


Like this recipe? Check out my cookbooks, The Spring Kitchen, available on Amazon in print and kindle formats.

Thursday, August 21, 2014

Summer Vegetable Soup with Parsley Pesto

I have some really great news! My second cookbook, The Summer Kitchen, is almost done! It is being proof read and then it will be available on Amazon in print and kindle formats. Isn't that exciting?

In the meantime, I made a delicious summer vegetable soup that is very similar to Soupe au Pistou, a rustic Provencal soup that has a French version of pesto (they call it pistou) dolloped on top. I had a few extra tomatoes and zucchini from my cookbook photos, and I had seen this soup while browsing through a cookbook so I knew I had to make it!

My version of this soup has lots of vegetables, including zucchini, tomatoes, green beans, white beans, carrots, celery, onions, garlic and corn. For the pistou part of the soup, I blended together garlic, parsley and the leaves from the celery stalks with some olive oil to create a paste.  The celery leaves taste a bit like apples, which gives an extra dimension of flavor. The paste was delicious in the soup, but was also delicious smeared on some sourdough bread and placed under the broiler for a few minutes. It was so yummy I had a second bowl!


Summer Vegetable Soup with Parsley Pesto
serves 4

1/2 yellow onion, chopped
2 cloves garlic, minced
1 carrot, peeled and chopped
2 stalks celery, chopped, leaves reserved
1 pint cherry tomatoes
1 tbsp salt
4 c. chicken or vegetable stock
1 zucchini, chopped
1 c. green beans, frozen
1 c. corn kernels, frozen
14 oz can white beans, drained and rinsed

Pesto:
2 cloves garlic, peeled
1 handful parsley leaves
celery leaves from above
1 tsp salt
1/2 tsp pepper
1/4 c. olive oil

In a large stock pot, heat 1 tbsp oil over medium heat. Cook onion, garlic, carrot and celery pieces for 5 minutes or until soft. Add tomatoes, salt, and stock. Bring to a boil, then reduce to a simmer. Cook for 10 minutes, then add zucchini, beans and corn. Cook for another 10 minutes, adding beans during last 2 minutes. Turn heat to low and set aside while making pesto.

To make pesto, combine all ingredients in a food processor and process until a paste forms. Ladle soup into 4 bowls, then spoon a dollop of pesto on top of each. Serve with crunchy bread.


Like this recipe? Check out my cookbook, The Spring Kitchen, available on Amazon in print and kindle formats.

Friday, August 15, 2014

Glacier View

I'd like to start out this post with the comment that this hike had some of the best views I've ever seen since I started hiking. And to boot, it was a short 4 mile hike with only 900 feet of elevation. If you haven't done this one, go do it this weekend. I'm serious! It's outside the park boundary, so dogs are welcome.


I picked this one out of my guide book, Day Hiking: Mt. Rainier because it was near Mt. Beljica, both of which are off the Copper Creek Road. The Copper Creek Road is a little hard to find since there is only one little teeny sign that says "59," as in FS 59, aka Copper Creek Road. We passed by it on the way there, but turned around at the Copper Creek Inn (which has delicious pie, might I add!) and headed up the road.


The first mile or two were not the best. There were a lot of pretty deep potholes, but we were in a Ford Escape and it handled them no problem. The last few miles of the road were in really good condition, which was odd, since the first few miles were so bad.


The hike is at the very end of FS 59, which is about 8 or so miles in. I'd suggest bringing a paper map of the roads with you (Green Trails one worked great!) because there are a few side roads that split off and look like they could be the main road. The trail head is well signed and so is the rest of the trail.


For the first half mile or so, you get glimpses of Mt. Rainier and its beauty. Soon after, you head on the other side of the ridge where you won't see anything but trees and some mini-meadows until the very end of the hike. The view from the top is amazing! Even though it was hazy, I could clearly see Mt. Adams, Mt. St. Helens, the Olympics, and I could even pick out Tacoma! I'm sure on a clear day you could see the whole Puget Sound area!


I seriously did not want to leave, but Andrea had to get back home so we headed down to the car. It was a spectacular hike that left me wanting to go explore that area more.

Special Announcement!

I have a special announcement today! My second book, The Summer Kitchen, is now in the editing phase, which means I will have it finished early next week.

In addition, I have a special surprise for everyone! If you send an email to rachelvdolekkitchen@gmail.com with the subject "Free SK Preview" I will send you a free 12 recipe sample of my ebook. You know you wanna see the recipes!

Hope everyone has a wonderful weekend!


Wednesday, August 13, 2014

Bench and Snow Lakes

The hike to Bench and Snow Lakes is not a hard hike, but when you add in heat and super bugs, it's not as much fun, but still just as beautiful.

It was a gorgeous sunny day, but a little too hot for my taste. We forgot the bug juice and suffered the consequences. The hike meanders up through the forest to a meadow area filled with snags. The snow was still lingering on some of the adjacent mountains, making it feel more like June, not July. We got to Bench Lake to discover that the shore was very overgrown and there was pretty much no where to stand. Onward we went.


Snow Lake was much prettier than Bench Lake, with that glacier blue color that I just love! The bugs at Snow Lake were just as bad, so we barely dipped our feet in before we left. Well, Mark went fishing for a bowl he saw at the bottom of the lake. Turned out it was a lot father down than he expected!


We decided to seek out a tarn that was mentioned in the guide book, so we followed the trail up into the boulders. Soon, there were no more bugs! I was so relieved. We continued up the hillside before coming to a nice flat rock to take a break. We contemplated going up this steep chute to bag Castle and/or Unicorn, but I was too tired and the snow in the chute was a little too melted to make an easy climb up.


So we settled for hiking back down into the bugs and accidentally got off course when we spotted a male deer just chilling near some rocks. We stood there in silence while watching him lay down in a spot that was obviously his. I took as many photos as I could! He was so beautiful!


We left the guy in peace and headed back to the trail. The bugs immediately swarmed us, so we began running (well, more like serious hobbling) down hill. We came across a few parties that were shocked at our sudden presence. One lady asked if there was a bear or something. Nope, just a lot of bugs!


We definitely learned that we needed to buy some bug spray, which we promptly did the very next day. I counted around 30 mosquito bites, not a record, but it was up there. I'd love to go back to Snow Lake in early fall, when there wont be as many bugs!


Share This!